Contents
- Index
Rights, Roles, and Security Event Logging
From the Security menu, select Rights, Roles, and Event Logging.
Rights and Event Logging
This area lists all of the available rights in Docs2Manage (D2M). Rights are assigned to roles (see below Role Rights section below).
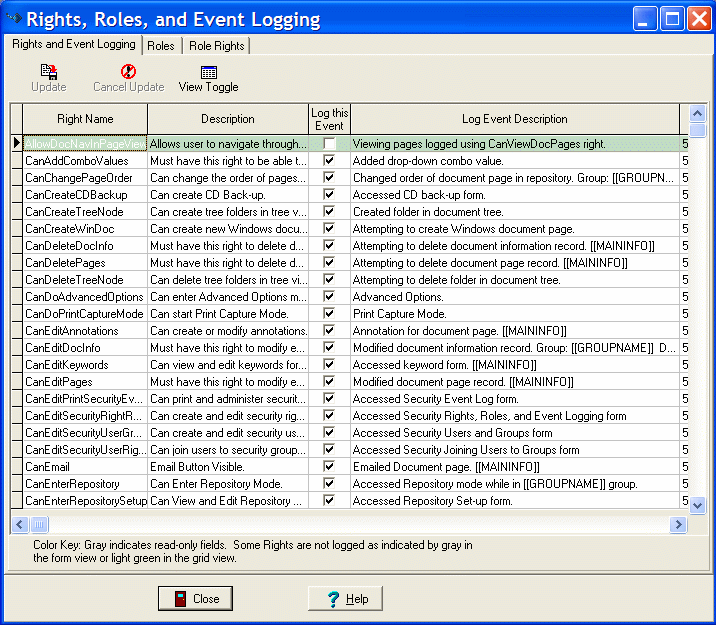
The Right Names cannot be modified, but the Description and Log Event Description can be modified. The Log Event Description will be recorded in the Security Event Log and reports.
The Update button commits any changes to the current record.
Event Logging
Check a right's Log this Event checkbox to log when any user in any of the security groups accesses this right. Be sure to test the events you want to log and check if the description you have entered is acceptable in the description of the actual log. You can view or print the event log by accessing the log in the View and Report Security Event Log form.
Log Event Description
In most cases, the log event description will be copied to the actual event log and will be printed in the Event Log Reports. In some cases the system will add additional information when necessary to further describe certain activities, but log description will always be included in the event log. This description can be modified for your organizations specific purposes. Several merge fields can be used in the log description text and will be filled in at the time of the specific event. These merge fields are as follows with description in parenthesis:
Security Specific Merge Fields:
[[DOCGROUP_ID]] (Value of security group ID when user caused event)
[[GROUPNAME]] (Security group name when user caused event)
[[USER_ID]] (Value of user ID that caused event)
[[USERLOGINNAME]] (User Login Name from database that caused event)
[[DBNUM]] (The database number the user is using to access current database)
[[DBNAME]] (The database name the user is using to access current database)
Information About the Document Merge Fields (DOCMAIN table fields):
[[DOC_ID]]
[[DATEENTERED]]
[[DATEOFDOC]]
[[DOCENTITY]]
[[DOCFOLDER]]
[[DOCTYPE]]
[[DOCSOURCE]]
[[IMPORTANCE]]
[[DOCREF]]
[[NOTES]]
NOTE: These merge fields should only be used on rights that have something to do with a document. For example, it would not make sense to record the value of the DOC_ID when a user decided to change the Docs2Manage Theme (CanSelectTheme). Also, the rights CanScan, CanLoad, CanCreateWinDoc initiate the entry of a new document; when these rights are accessed the data fields are not yet known. It would be better to use the data based merge fields on the CanInsertDocInfo and CanInsertPages right, since they record the values after the document or page is actually saved successfully.
TIP: If you are not sure what data fields correspond to the fields you are using, you can view the mapping in the field manager. You can also place the cursor on the field in question and click [F12] while in the Document Information form. This will tell you the actual field name of the underlying data field, which you must use as the merge field name surrounded with double brackets.
Page Specific Merge Fields (DOCPIC table):
[[DOCNUM]]
[[DOCNAME]]
[[SRCFILENAME]]
[[DOCNOTES]]
NOTE: Do not use page level data fields for document level operations like CanInsertDocInfo or CanEditDocInfo, since those operations have nothing to do with document pages.
Other Helpful Merge Fields:
[[MAININFO]] (Is the equivalent of "Group: [[GROUPNAME]] Doc_ID: [[DOC_ID]] Doc Num: [[DOCNUM]]")
EXAMPLE: If you use the field IMPORTANCE to hold the value of an invoice number, and want to see when someone changes a image of a page in an outside editor and then post the changes to the database, you would want to log both the CanModifyImages and CanEditPages rights. Under the log description for CanModifyImages you may want the description to be:
User modified invoice number [[IMPORTANCE]] page [[DOCNUM]]
And CanEditPages log description to be:
Page record for invoice [[IMPORTANCE]] page [[DOCNUM]] changed.
As a result, the event log would capture the event with a description easily understood for both events accessed.
Roles
This area lists all of the possible roles available in D2M. Roles will have rights assigned to them (see below Role Rights section) and then a role is assigned to each user for each group they are a part of.
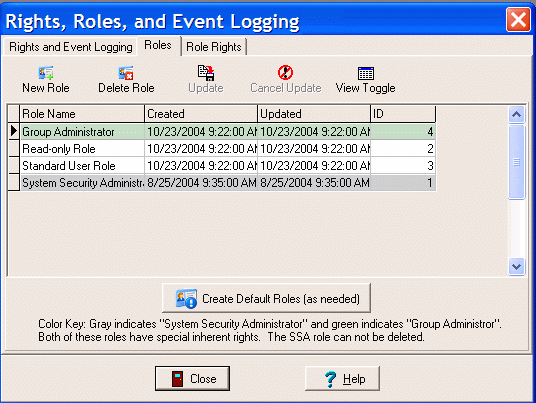
Click the Create Default Roles (as needed) button to create the following default roles with suggested rights if they do not already exist:
System Security Administrator - inherent right of being able to access the security forms; add, change, or delete users, groups, and roles in any group
Group Administrator - inherent right of being able to access the security forms; add, change, or delete users, groups, and roles for groups that it has that right
Standard User Role - all rights except Administrator level rights
Read-only Role - read-only access
The default role rights can be modified on the Role Rights form, as explained in the section below.
To add a new role:
1. Click the New Role button.
2. Enter the Role Name of and Description.
3. Click the Update button.
4. Add additional roles by repeating steps 1-3.
5. Click the View Toggle button to return to the grid view of all roles.
New roles do not have any rights assigned to them. Add rights on the Role Rights form, as explained in the section below.
Role Rights
This area displays what rights belong to a particular role. Roles will be assigned to a user in every group they are joined to. The Joining Users to Group / Special Rights section covers which groups (or departments) a user can access and what role (rights) they have in those groups.
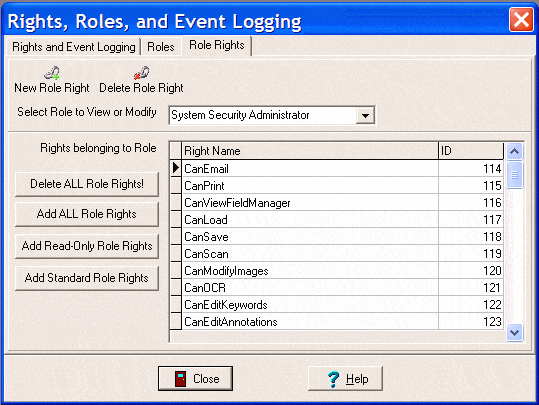
Select a Role from the drop-down list. Any assigned rights will be displayed in the grid below.
Add role rights by doing either of the following:
Click any one of the Add ALL Role Rights, Add Read-Only Role Rights, or Add Standard Role Rights buttons.
Click the New Role Right button to select a specific right from the remaining possible rights.
Delete role rights by doing either of the following:
Click the Delete ALL Role Rights! button.
Select a specific right from the grid listing and click the Delete Role Right button.
NOTE: Regardless of what rights belong to a role, you can always override a specific user's rights by granting (or revoking) that user from the User Special Rights page tab. Therefore, you do not have to create different roles for every possible user scenario.
..